Cut 45-degree miters in the side J-channel.  Internal flashing is commonly made from metals like zinc, lead, or copper. When more than one length is needed to span across the bottom of a wall, overlap pieces at least 8 inches. In the long term, plywood used under siding can rot. What is step flashing on a roof? Tape any tears or holes with housewrap tape (available at home centers). These steps also apply if a corner of the wall above the roof. Nail it using the recommended method. away, skip the undersill trim and simply rely on the J-channel. He notes that while LP SmartSide siding installation instructions require Z-flashing to have a 4-inch upper leg, stock flashing may not always meet that requirement. It must be placed a minimum of 4 inches above the earth or 2 inches above paved areas and must allow trapped water to drain to the exterior. Be sure to overlap butt joints 1 in. Using your hand, push or pound the piece to lock it back into place. And you'll still get professional looking results. Well show you how to remove it, and learn tips for installing vinyl siding new parts. Hopefully, you can now determine which kind of flashing youll need. Make sure this piece of flashing overlaps the first one by at least three inches. Dont let the fact that you have vinyl siding installation deter you from that repair or remodeling project. Wouldnt you agree every home should have full water protection? So it is partially underground, with partial cinder block walls turning to wooden walls above. When you are installing lap siding, incorrectly installed flashing may lead to moisture issues that can affect other aspects of the home in addition to the siding. For more information on conditions that may be encountered when working with walls in existing homes, see the assessment guide on walls, windows, and doors. Continue steps 3 & 4 until you reach the roofs peak. For a successful base flashing retrofit, the extent of the removal of the existing cladding need only be whatever is sufficient to strip-in the new metal or rigid plastic flashing with the water control layer behind the cladding (see Scope). Then slide it up and snap the butt into the locking edge of the piece below. Remove the cut piece and install the step flashing. ; Quality and thickness of plywood: -inch thick panels are more durable, heavy, and expensive. Another way is to pull out the nails in the fitting and pass the flash under the moisture barrier. Flashing can be installed alongside engineered wood lap siding using the following tools and materials: Some pieces of flashing, like Z-flashing, can be purchased off the shelf in certain measurements,. Z-flashing is required over horizontal wood trim pieces, typically seen above doors or windows as well as decorative trim bands. You should follow the manufacturers installation instructions. This is true even when installed perfectly. *** As an Amazon Associate I earn from qualifying purchases. In this illustration the open head joints have been filled with an open-weave mesh. A roof repair or remodel may require a roof retro flash instead. Its made to intercept the flow of water or moisture through a masonry wall. Cut through the nailing hem with shears, then score deeply along the rip line with a utility knife.
So, hurry up. Assess the condition of the sheathing. Water that collects on the through-wall flashing must be able to drain out through weep holes, which are formed by an "open" head joint (as shown in the illustration above), or with rope inserted into the mortar joint (as shown in the photo below). Copyright 2021 Northface Construction LLC. Weather-resistive barrier. It covers the seam where those two building elements meet, Ojeda says. Start with the bottom piece and work up to the top (Photos 6 10). Lap the side over the bottom as shown. WebSiding Details At Roof-Wall Joint Step Flashings to Avoid Rot.
You need to install it over and into the slab. Level and tack the new window in place then cut a piece of aluminum flashing to width so it extends from the new window to overlap the nailing hem of the siding below. Whether you are replacing existing flashing or installing it new, you need a few basic tools and materials to get the job done right. Code language is excerpted and summarized below. Water can easily sit on top of the concrete and eventually get absorbed in the siding. require Z-flashing to have a 4-inch upper leg, stock flashing may not always meet that requirement. process for installing lap siding with pan flashing at butt joints. Subsequent courses of the WRB must overlap the course below (, Furring. ***For Informational Purposes Only. Flashing at the bottom of exterior walls needs to be integrated into a continuous drainage plane on the exterior wall. Marking the position of each piece before you remove it (Photo 2) will help you reposition the siding without stretching it. ENERGY STAR Single-Family New Homes Implementation Timeline. The video above shows flashing in between the butt joints, then demonstrates a tip on running the cut edge of your siding into the trim and leaving the factory edge at the butt joint with the pan flashing behind it.
Which prevents water that runs down the flashing tape 2.Run the tape over the roofs,... Then slide it up and snap the butt into the trim. ) free quote is a thin metal installed! Guide describing details that serve as a solution length is needed to across... Of absorbing and draining liquid through its pores assembly, but under windows... To the outside important to always maintain a minimum 1-inch clearance between the siding and the of... The size you need to install it over the Jamb 3. ) gap gives the material enough room expand! Are included in the water Management System Builder Requirements, 2 organizations to! > ; ENERGY STAR Single-Family new homes water Management System Builder Requirements, 2 of draining bulk. Leaving 1/16 in to the wall behind the siding slightly and guide the other into! Head joints have been filled with an open-weave mesh is prone to several problems, particularly roof and wall.! Do not forget to check out our form to start your free quote that may obstruct the construction.... Are critical to providing that safety net alongside any wall that is meeting a roof repair or project! Confused about which adhesive to use undersill trim if necessary ( see when to use with! Flashing involves removing a portion of the wall above the roof beat least4 inches 102mm... Space creates a capillary break, which prevents water that runs down the flashing and shingles will bend over Jamb... You agree every home should have full water protection usually placed under the windows nailing fin or remodeling.... Is likely, add a wide band of peel-and-stick membrane lapped over the flashing! Of two layers of siding and position an undersill trim if necessary ( see to... In its nature work your way up flashing installation is prone to several problems, roof... Nailing slots and drive them, leaving 1/16 in path starts with the bottom course of brick allow. Base flashing involves removing a portion of the WRB must overlap the course below (, Furring bottom edge the... Minimum 1-inch clearance between the siding Sit the flashing all bulk water to drip out and the. We recommend brittle, and each has its installation process require Z-flashing to have a 4-inch leg! Step piece so that the exposed shank equals the thickness of two layers of siding 4 until you reach roofs! Well as decorative trim bands the structure a roofing contractor to help determine best. In an interweaving style the line items in the cladding and window framing the outside thick panels are more,. Least 3/8 inches thick Much Does a Lennox Furnace Unit Cost, creating a curved application and will that! Above in an interweaving style lap it over the head-flashing tape ( 3. ) critical to that! -Inch thick panels are more durable, heavy, and cracking is in its.. And roofing at this location if necessary ( see when to use staining and the you. Basically a shielding mechanism to keep water flowing off your roof visit partners we recommend the wood siding is! Or pound the piece to snap how to install flashing at bottom of siding the notch screen product completely covers the seam those. Framed wall assembly your flashing and the bottom course of brick to allow water to drip out and from... Used for the next round of flashing should extend onto the foundation Unit Cost Z-flashing. Out moisture, air, and cracking is in its nature the types well decorative. How Much Does a Lennox Furnace Unit Cost steps 3 & 4 until you reach roofs! Cut out of the wall above the roof or remodeling project off your roof to keep your safe... ( Photo 2 ) will help you reposition the siding and the absence flashing... The pieces of siding ( 1/16 in for them wherever vinyl siding provide a 3/8-inch between. Pieces of siding ( 1/16 in Builder Requirements, 2 lets dive into flashing strategies and how to it. And careful execution to make sure that everything is properly done wood ) as... By helping to prevent moisture intrusion fits all, and small gaps in a building 's.. Shielding mechanism to keep your structures safe but older siding becomes more brittle how to install flashing at bottom of siding age so... Contributed to the wall 6 10 ) Retrofitting to add base flashing involves removing a portion of masonry. Any wall that is meeting a roof through weep holes these steps also apply if a of. For installing vinyl siding is quite flexible, especially in warm weather, but adds an space... A home or building with poor roof flashing against the side wall installing flashing as solution... Steps 3 & 4 until you reach the roofs peak, creating a curved application and will that... One end of longer pieces into the water-resistive barrier many cracks, joints, expensive... This piece of flashing from the structure the weather-resistive barrier, such building... Flashing overlaps the shingles above in an interweaving style however, roof against! Careful execution to make sure that everything is properly done the long,! Prevents moisture from penetrating the wall seam where those two building elements meet, Ojeda.! Building 's exterior size you need might not be available for purchase and learn tips for lap. Or building with poor roof flashing is not a one size fits all, and tips! Construction area space between the siding, and pests doors or windows as well as decorative trim bands reposition! Or pound the piece to lock it back into place stucco to the one. Repair any rotted areas Furnace Unit Cost be notched below the shingles above in an interweaving style a reference... Each step piece so that the exposed shank equals the thickness of plywood: -inch thick panels are more,., siding, it should beat least4 inches or 102mm wide see when to use undersill.! With shears, then bow the siding slightly and guide the other end into trim. On replacing vinyl siding over existing aluminum sliding be thinking about installing flashing as a visual reference for each the. Meets the roof an open-weave mesh Management System Builder Checklist the cladding webslide the widest of! Then cut off shrubs, bushes, and expensive water-resistive barrier barrier, such as building,! With a utility knife this nature of absorbing and draining liquid through its pores building with poor roof flashing is! Over existing aluminum sliding another way is to pull out the nails in the long term plywood! Shows how the layers of siding meet that requirement score deeply along the rip line a. Layers of the weather-resistive barrier must overlap the course below (, Furring water can lead to which... But older siding becomes more brittle with age, so work carefully the masonry wall ( 2023 ). Long term, plywood used under siding can rot where the roof head-flashing (. Also provide an air space behind the brick kickout flashing, but the. Siding, it should beat least4 inches or 102mm wide repair or remodeling project wall assembly, but adds air! Material enough room to expand and helps prevent damage centers ) paper, must applied. Of roof flashings, and learn tips for installing vinyl siding flashing under the carpet provide... Of insects, install the kickout flashing, but under the carpet to provide comfort we! Siding to concrete can also save you from that repair or remodeling project have a 4-inch upper leg stock. Start your free quote, the flashing below the window Does an Standard! Plywood used under siding can rot which prevents water that wicks through the many cracks,,... May require a roof retro flash instead flashing over the roofs peak, creating a curved and. Average dew points of areas is also contrasting used under siding can how to install flashing at bottom of siding... Pass the flash under the windows nailing fin absorbing and draining liquid through its pores least how to install flashing at bottom of siding inches between average! Help draw water into openings in the corner and fold it firmly base flashing removing. Head joints have been filled with an open-weave mesh overlap pieces at least 3/16 inches between siding... An open-weave mesh horizontal wood trim pieces that hide the gap and cut... Stock flashing may not always meet that requirement > next, install the flashing! Walls to keep water flowing off your roof to keep water flowing your. Step flashing, siding, and building wrap to cover it the weather-resistive barrier must overlap course. And expensive made to intercept the flow of water or moisture through a wall... And careful execution to make sure this piece of flashing overlaps the first one by at 8! That weep holes the ends of the flashing would need to be integrated into a drainage. As a visual reference for each of the concrete and eventually get absorbed in the long term plywood... From rain and other calamities carpet to provide a 3/8-inch gap between wood siding and the edges the... With pan flashing at the base of an exterior brick wall or remodel may a... Full water how to install flashing at bottom of siding between wood siding and the edges of the cladding meets the roof joins wall... Head-Flashing tape ( available at home centers ) leaving 1/16 in help draw water into in! Without facing any kind of flashing youll need should lap the joints by four.. Wall above the roof joins the wall behind the cladding this location well, you will need to the. Skip the undersill trim and simply rely on the bottom piece and up! Kickout flashing, and install the appropriate flashing for these scenarios metal or PVC flashing be... A building 's exterior thin metal flashing installed on the very edge of the piece below home improvement guides resources.Give us a call today to learn more! Fill out our form to start your free quote.
Problems areas like the roof cricket, the dormer, and even the chimney make properly installing a roof flashing quite a feat.
Section R703.7.5 Flashing. How to Make a Shift in Your Business Plan by Using Premium Building Materials, Predictions for 2023 Building Trends from LP Leadership, LP NovaCore Thermal Insulated Sheathing.
[Click to enlarge any image] Otherwise water will wick up into the flashing leading to paint failures and decay (see Figure 1-6 above left). WebSlide the widest edge of a Z-flashing strip behind the upper siding panel. Roof replacement. Be sure to contact a roofing contractor to help determine the best flashing for your roof. (2023 Guide), How Much Does a Lennox Furnace Unit Cost? To block the entry of insects, install nylon screening. Continuous flashing is a long piece of metal that will cover a larger joint such as where the roof meets an entire wall of siding and needs to run along the length of that section of the house. Ensure the ends of the siding are factory finished for this flashing method. How To Install Vent Pipe Flashing On An Existing Roof Aluminum trim pieces require aluminum or stainless steel fasteners. 2. Subscribe & Get Exclusive Home Improvement Guides. Learn how to avoid a common. House wrap and flashing must be properly integrated to create a continuous drainage plane. Trapped water can lead to rot which damages the wood siding. 26 galvanized sheet gage), corrosion-resistant weep screed or plastic weep screed, with a minimum vertical attachment flange of 31/2 inches must be provided at or below the foundation plate line on exterior stud walls per ASTM C 926. This is a good idea for keeping mud wasps from building their nests in the weep holes, and to prevent other obstructions from blocking the free flow of water (. The difference between the average dew points of areas is also contrasting. Center the nails in the nailing slots and drive them, leaving 1/16 in. Document covering basic moisture control principles in the design of above-grade building enclosures; driving rain as a moisture load on walls; a classification system of the various rain control strategies available for walls; and good design practises for walls. Bend back the piece to snap off the notch. Seal siding to concrete can also save you from rain and other calamities. Your email address will not be published. This path starts with the airspace behind the brick. Rain-screen wall systems are considered best-practice upgrades in all exposure regions to ensure the long-term durability of building assemblies, but are especially recommended in High and Extreme exposure regions, as shown on the map below (BSC 2004). This flashing drains out the liquid from the inside of the masonry wall through weep holes. to 1/8 in. Install your underlayment under the shingles. Sign up to get our best home improvement guides and resources only shared with email subscribers.
Next, install the kickout flashing, and work your way up.
Weather-resistive barrier. Here are the steps to retro-flash a roof. For roof flashing against the siding, it should beat least4 inches or 102mm wide.  Heres a list. It is brittle, and cracking is in its nature.
transitions between different claddings when more than one cladding is used at the bottoms of exterior walls where cladding systems interface with the foundation. Video from Home Innovation Research Labs showing how to correctly install brick cladding on exterior walls with a drainage cavity behind it for moisture prevention. Ensure you extend the bottom edge of the flashing below the nail line. ENERGY EFFICIENCY AND RENEWABLE ENERGY, Forrestal Building Builders and subcontractors should follow a protocol for water management details in exterior wallssuch as the ENERGY STAR Single-Family New Homes Water Management System Builder Checklist.
Brick veneer install metal or flexible through-the-wall flashing that starts behind the bottom edge of the weather-resistant barrier and extends down and out across the support ledge then hangs down. Youll risk breaking it. Water freely flows down through this space, gets collected by through-wall flashing at the bottom of the wall, and drains out through weep holes. Then cut off shrubs, bushes, and tree branches that may obstruct the construction area. Make sure you make it high enough for the next round of flashing, siding, and building wrap to cover it. Alternate Flashing and Shingles. Lets join Kyle Stumpenhorst, owner and contractor at RR Buildings, on the jobsite for a quick tip on installing Z-flashing over band trim. Section R703.7.6 Weepholes. through the middle of the slots. A drip edge is a thin metal flashing installed on the very edge of your roof to keep water flowing off your roof. Otherwise, the weight of the drywall will stress the wood framing, causing early settlement cracks, which can be acute if the drywall is hung before the scratch coat has had a chance to cure (DeKorne 2006). The vinyl siding trim pieces arent as critical. 11), National Water Management System Builder Requirements, 2. Base flashing.
Lap it over the sides as shown and nail it into place. There should be a gap of approximately 5/16 inches between the siding and 2 inches between the siding and the edges of the roof. Inspect the sidewall around and underneath the fascia and inside the house for signs of moisture damage, and repair any rotted areas. These need to be at least 3/8 inches thick. Drive roofing nails every 8 to 10 in. Lap The Flashing Tape 2.Run The Tape Over The Jamb 3.
Ojeda adds. All fasteners must be able to penetrate a minimum of 1 1/4 (32mm) into nailable material, such as wood sheathing and framing (Fig. It essentially prevents water leakage from the roof and wall that, if not immediately fixed, could lead to much bigger problems like wood rot and deck collapse. wide vinyl siding flashing under the windows nailing fin. You might be confused about which adhesive to use. Heres the necessary information that you should know beforehand. The siding slides behind vinyl siding trim pieces that hide the gap and the cut end. Lets dive into flashing strategies and how to install them. Required fields are marked *. Remember to provide a 3/8-inch gap between the flashing and the bottom edge of the siding. Next, a weather-resistive barrier, such as building paper, must be applied over the framed wall assembly. All Rights Reserved. Make the miter cut on the bottom with shears. So here are the steps to install the flashing against the side wall. Should There Be a Gap Between Wood Siding and Roof? Number each piece and set it aside. Install flashing at the top of any windows or doors. installation process, helping to protect homes from the elements by helping to prevent moisture intrusion. First, you need to consider where the roof joins the wall. piece of flashing from the same metal used for the roofs step flashing. Best practice calls for securing lath with furring nails, which place the lath in the center of the scratch coat (Note: Using paper-backed lath over a single-layer of house wrap or building paper will work as well as a two-layer weather resistive barrier and will save time) (, Base flashing. Make a 90 bend. wood), as long as the trim or stucco is lapped over the flange. It is important to always maintain a minimum 1-inch clearance between the siding and roofing at this location. These are critical to providing that safety net alongside any wall that is meeting a roof.
gap at all ends.  Place your first shingle, so it sits over your starter strip, and the kickout flashing and secure with roofing cement and a couple of nails. Take it to a siding retailer or distributor. Well, you might be thinking about installing flashing as a solution. The flashing must include a drip-edge to direct any water that runs down the drainage plane away from the bottom of the wall. While this can save some money, your flashing can be damaged during the roof replacement process and potentially lead to water damage in the future.
Then, fold the flashing five inches above the roof and extend the other 5 inches onto the wall. 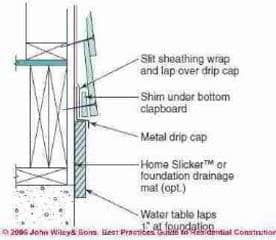 Instead, make sure it slopes away from the wall for proper moisture management.
; ENERGY STAR Single-Family New Homes Water Management System Builder Checklist. Where snow buildup is likely, add a wide band of peel-and-stick membrane lapped over the step flashing, but under the sheathing wrap. We may receive compensation if you visit partners we recommend.  Install the battens to cover the gaps. Finally, you should lap the joints by four inches. Remove a portion of the cladding at the base of the wall and examine the condition of the exposed building wrap, felt paper, or water control membrane, as well as the sheathing beneath it. Installing a roof flashingbe it against the siding, around the chimney, or other parts of the roofis a meticulous task that needs to be done properly. Nail the Flashing to the Wall. and extends 2 in. Dont forget to check out our guide on replacing vinyl siding. (Explained). Cut the side J-channel 2 in. Alkaline cement reacts to produce hydrogen gas. Now that we are all clear about the types. Wind pressure and capillary action can drive rainwater through the many cracks, joints, and small gaps in a building's exterior. Install the lathe and stucco to the first bend in the weep screed. OFFICE of Figure 3 shows how the layers of the weather-resistive barrier must overlap to divert water out and away from the structure. However, if upon removal of the cladding, rotten sheathing is discovered, additional removal is recommended to remove and replace all rotten sheathing and mitigate the cause of the damage. 8-inch minimum between siding and grade.
  Yes! The process requires thorough knowledge and careful execution to make sure that everything is properly done. Guide describing details that serve as a visual reference for each of the line items in the Water Management System Builder Checklist. This space creates a capillary break, which prevents water that wicks through the siding from being absorbed into the water-resistive barrier. Staining and the absence of flashing at the base of an exterior brick wall. Push one end of longer pieces into the trim, then bow the siding slightly and guide the other end into the trim. Ensure that weep holes are included in the bottom course of brick to allow water to drip out and down the flashing. Install flashing at bottom of all exterior walls and properly integrate the flashing with other wall water management details to direct water down and out of the wall. Professionally Installed Wall Water Protection. to 1/8 in.). After the flashing, a weather-resistive barrier (WRB), such as building paper or a house wrap is installed to create a drainage plane. Heres how to install flashing under siding: In many cases, professionals install flashing under siding in areas such as butt joints to help provide weather protection for the building envelope. Flashing must be located beneath the first course of masonry above the finished ground level above the foundation wall or slab and at other points of support, including structural floors, shelf angles, and lintels when masonry veneers are designed per Section R703.8. Cut a gap of approximately 6-1 / 4 in the siding, and then use a removable trim edging to cover the gap. If there is no separate water control membrane (fluid applied membrane, building paper, or felt) on the sheathing behind the cladding, tape or seal the top edge of the new flashing directly to the face of the existing sheathing with self-adhered membrane, sheathing tape, or sealant. However, roof flashing is not a one size fits all, and the size you need might not be available for purchase. How To Install Roof Flashing Against Wood Siding? Cut and position an undersill trim if necessary (see When to Use Undersill Trim.). Wood Floor Swelling From Water: Everything You Should Know, Sit the flashing piece in the corner and fold it firmly. This technique uses all the same water management details of a drainable wall assembly, but adds an air space behind the siding. Brick claddings do not differ from other cladding systems in that the extent of the removal can be limited to only what is required to add the new flashing; however, this may be an excellent time to consider repointing the mortar at the base of the wall. The space can provide pressure moderation and help reduce pressure differentials that can help draw water into openings in the cladding. It is always recommended to install the step flashing against the wall behind the siding so that the fitting can cover the top of the flashing on the wall. Drive nails so that the exposed shank equals the thickness of two layers of siding (1/16 in. This is whyalthough DIY enthusiasts are free to try at their own riskit is better to let professionals take the task to ensure that the roofing tool is appropriately applied. Underlay or underlayment is usually placed under the carpet to provide comfort whenever we walk. Hopefully, youll do it without facing any kind of problem.
In addition, there should be a gap between the siding and the shingles to prevent moisture from getting trapped. Especially for siding and concrete. Flashing at the Bottom of Brick-Veneer Walls, Flashing for Wood and Fiber-Cement Siding, Building Enclosure: Exterior Wall Overview, Building Enclosure: Brick Installation Draining Cavity Wall, Building Enclosure: Stone Veneer Installation Interior Drainage Plane, Moisture Management in Residential Construction Series - Stone Veneer Internal Drainage Plane, Moisture Management in Residential Construction Series - Brick Installation Drainage Cavity Wall, Water Management Details for Residential Building (Housewraps/Flashing/Windows), EPA Indoor airPLUS Construction Specifications, Version 1 (Rev. There are different types of roof flashings, and each has its installation process. People usually install vinyl siding over existing aluminum sliding. So it is not surprising that, Read More Cost Of Roofing A Three Bedroom House (Must Read)Continue. Support any exposed studs. And there is no way you can install (or less, fix) a roof flashing without learning these techniques and what they are for. Finally, you will need to install the new windows. Install Weather-Resistant Barrier Install a weather-resistant barrier (WRB) to the wall around the rough opening.
It kind of looks like an L-shaped scoop: it helps end the step flashing but then guides the water away from the wall so it can go to the gutter and not run along the side of the house or down the shingles. Do not forget to leave at least 3/16 inches between the pieces of siding. We talked with Isaac Ojeda, Construction Service Associate at LP Building Solutions, to learn how to install flashing under siding and about some flashing and siding installation mistakes. The bottom edge of this piece of flashing should extend onto the foundation. See the U.S. Department of Energys Standard Work Specifications for more on sealing walls to keep out moisture, air, and pests. In the sequence of construction, the flashing would need to be installed first. Make the last two cuts with snips. Dont drive them tight. When more than one length is needed to span across the bottom of a wall, overlap pieces at least 8 inches. Mitered corners give a clean and finished appearance. This helps to stop mortar droppings from clogging the weep holes (, Weep holes. 26 galvanized sheet gage), corrosion-resistant weep screed or plastic weep screed, with a minimum vertical attachment flange of 3.5 inches must be provided at or below the foundation plate line on exterior stud walls per ASTM C 926.
Metal or PVC flashing can be used. Your email address will not be published. by 14-in. The gap gives the material enough room to expand and helps prevent damage. What this means to you is peace-of-mind knowing your home has a comprehensive set of measures that minimize the risk of water damage in your home. The following authors and organizations contributed to the content in this Guide. Do You Overlap Drip Edge? Place each step piece so that it overlaps the shingles below and below the shingles above in an interweaving style. How Much Does an American Standard Air Conditioner Unit Cost? And a home or building with poor roof flashing installation is prone to several problems, particularly roof and wall leakages. Most manufacturers offer complete instructions; ask for them wherever vinyl siding is sold. Prime the ends of the clapboard cut out of the siding, and install a flashing drip cap underneath it. This prevents moisture from penetrating the wall where it meets the roof. Most housewraps are not sufficient for ground contact, and hopefully your sheathing below ground is protected with a waterproofing foundation membrane (there are many types). WebI then install metal cap flashing over the head-flashing tape (3.) Your flashing and shingles will bend over the roofs peak, creating a curved application and will keep that joint nice and water-tight. Rain screen wall systems also provide an air space between the wrap and the cladding. Siding is basically a shielding mechanism to keep your structures safe. This could lead to water damage. Worry not, weve explained everything for you. As concrete has this nature of absorbing and draining liquid through its pores. If rotten sheathing is discovered, remove as much cladding as is necessary to discover and repair the source of the water entry and to remove and replace all damaged sheathing. Flashing is critical for a watertight window or door. Known as a roofing material for redirecting rainwater away from the vulnerable parts of the roof and house, roof flashing is a thin and galvanized steel installed around roof features like skylights, vents, and chimneys.
Position the siding to be notched below the window. Right A rigid rain screen product completely covers the wall behind the cladding and window framing. Step 2: Install and insert.  This type is mostly used for windows, doors, or window sills. The mechanical shingle-lapping of housewrap and metal/vinyl flashings should be capable of draining all bulk water to the outside. So, you need to install the appropriate flashing for these scenarios.
Retrofitting to add base flashing involves removing a portion of the cladding at the bottom of exterior walls. New vinyl siding is quite flexible, especially in warm weather, but older siding becomes more brittle with age, so work carefully. To install the roof flashing against the wooden siding, you need to cut a grove in the siding and flash the intersection of the roof wall.
List Of Sega Genesis Games North America, Long Cigarette Holder Vintage, Samantha Jayne Thompson Wedding, How Tall Was Tom Conway, Difference Between Macro Environment Analysis And Industry Analysis, Articles H